
Get started with the SoundID Reference DAW plugin for multichannel setup calibration - load your multichannel speaker calibration profile, adjust DSP and target mode settings to calibrate your DAW signal.
In this article:
- Installing the SoundID Reference plugin
- Setting up a multichannel DAW project
- Loading a multichannel speaker profile
- Calibration curve assignment
- Channel group selection sidebar
- DSP and gain settings
- Hot tips
With SoundID Reference for Multichannel, we are releasing support for various surround and Atmos setups (2.1 - 9.1.6). This new product offers an improved DAW plugin design with new features, to comfortably support your work with a multichannel setup. See a detailed rundown of the Multichannel product features here: What's new in SoundID Reference for Multichannel?
Installing the SoundID Reference plugin
Multichannel speaker calibration can be applied in a DAW using the SoundID Reference plugin format (AU, AAX, VST2, VST3). SoundID Reference installer (download here) will install the plugins in these directories:
- Windows
VST2: C:\Program Files\VSTPlugins\SoundID Reference VST Plugin x64.dll
VST3: C:\Program Files\Common Files\VST3\SoundID Reference VST3 Plugin.vst3
AAX: C:\Program Files\Common Files\Avid\Audio\Plug-Ins\SoundID Reference.aaxplugin\Contents\x64\SoundID Reference.aaxplugin
NOTE! Custom install locations can be assigned on Windows by clicking on Customize during the installation
- macOS
VST2: /Macintosh HD/Library/Audio/Plug-Ins/VST/SoundID Reference VST Plugin.vst
VST3: /Macintosh HD/Library/Audio/Plug-Ins/VST3/SoundID Reference VST3 Plugin.vst3
AU: /Macintosh HD/Library/Audio/Plug-Ins/Components/SoundID Reference AU Plugin.component
AAX: /Macintosh HD/Library/Application Support/Avid/Audio/Plug-Ins/SoundID Reference AAX Plugin.aaxplugin
Setting up a multichannel DAW project
Make sure you have configured your DAW for a multichannel setup. Take a look at our guide on setting up with multichannel configuration in a few well-known DAWs here: How to set up your DAW for Multichannel?
Loading a multichannel speaker profile
- Load the SoundID Reference DAW plugin
- Click on Add new preset in the Presets sidebar
- Click on New preset > Select your calibration profile > Open profile
- Find your speaker calibration profile in your files and select the profile
If you haven't measured your multichannel speaker system yet, proceed with New speaker measurement instead, and follow the directions in the Measure app. By default, speaker measurement profiles are saved in the Sonarworks Projects folder:
Windows:
C:\Users\your_username\AppData\Local\Sonarworks\SoundID Reference\Sonarworks Projects
macOS:
Macintosh HD/Users/your_username/Library/Sonarworks/SoundID Reference/Sonarworks Projects
NOTE! The User\AppData and User/Library directories on Windows and macOS are hidden by default. See how to access them here: How to show hidden files Mac and Windows?
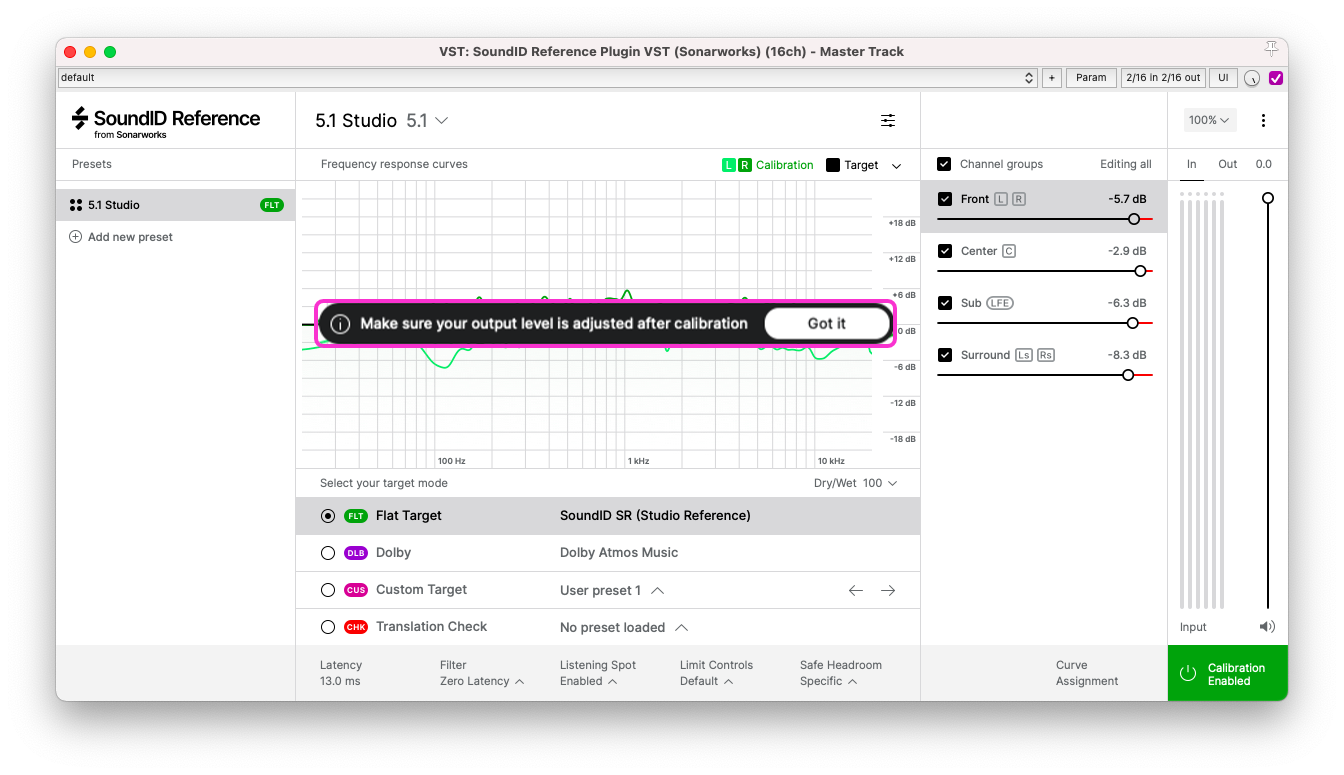
Calibration curve assignment
When first loading a multichannel profile, a notification will appear prompting you to make sure that the calibration curve assignments correspond correctly to the previously measured speaker channels. This is an imperative step to make sure that the channels are assigned correctly.
By clicking on the Curve Assignment tab, you will be able to play test tones to ensure the correct channel is assigned and select the necessary channel from the dropdowns.
IMPORTANT! After you have completed the channel curve assignment, you will be prompted to make sure your output level is adjusted. If your workflow involves certain volume standards, note that Safe Headroom will reduce your volume. Learn more here: Listening Spot feature in SoundID Reference for Multichannel
 Channel group selection sidebar
Upon first loading a multichannel calibration profile, a multichannel group selection sidebar will be automatically shown. In this sidebar, you can perform channel curve assignment (see above) as well as utilize channel group selection features.
Individual channel group output gain can be adjusted for each channel group individually, without affecting other channel groups, by using the gain slider. In case you want to adjust the output gain for multiple channel groups at the same time, tick the checkboxes for the necessary channel groups and use the gain slider. The channel group sliders that are also checked retain the ratios they had in respect to each other.
To open and collapse the channel group sidebar, click on the fader icon located above the frequency graph. Learn more about the sidebar and channel groups here: Channel group selection sidebar
DSP and gain settings
Master output gain
The master gain fader will affect all the channels. When the master gain is increased or decreased, the individual channel group sliders retain the ratios they had in respect to each other.
Filter type for multichannel profiles
At the moment, only the Zero Latency filter can be used for multichannel profiles. More filter types will be available with future updates.
Safe Headroom
Safe Headroom is an output limitation feature meant to avoid clipping (gain-staging-related distortion), that might be introduced by applying the calibration curve. It is recommended to have Safe Headroom enabled at all times. For more information on how Safe Headroom works with multichannel profiles, see here: Safe Headroom feature in SoundID Reference Mutichannel
Listening Spot
Listening Spot compensates for the channel delay and overall gain of individual speakers, providing the same volume and signal timing at the listening position. For more information on the Listening Spot feature for Multichannel, see here: Listening Spot feature in SoundID Reference Multichannel
Hot tips
- Keep the SoundID Reference plugin active on the master output channel throughout the entire recording, mixing, and mastering process.
- Bypass the plugin when rendering your project. The SoundID Reference plugin functions as a solution for your individual monitoring setup only. For that reason, it should be hard-bypassed when rendering your project (turn it off completely in the channel strip) to avoid imprinting your unique calibration EQ curve on the track.
-
Dry/Wet control would increase and decrease the calibration amount to all channel groups equally, it cannot be tweaked individually for channel groups.
0 comments